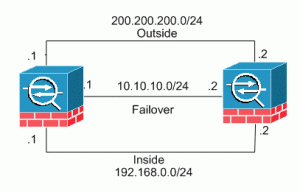
This article is purposed to explain on how to setup a High Availability between two Cisco ASA devices. It is highly recommended to implement two Cisco ASA in HA (High Availabilit). This means if the primary Cisco ASA fails, the secondary will become active automatically without any downtime.
Here is the example about how to configure it. Refer to the diagram for the detail:
 According to the the above diagram, here are the detail:
- Outside – Assign your external ip-address to the interface port 0 to each of the devices
- Inside – Assign your internal ip-address to the interface port 1 to each of the devices.
- Failover – Assign an internal ip-address to the interface port 3 to each of the devices that will be used between the primary and secondary devices during failover.
Notes: The interfaces assignments above are only a illustration and not a must. Adjust it according to your devices’ interfaces.
Now, add the following commands into your Cisco ASA like follow:
1. Setup failover interface on Primary ASA
enable
config t
failover lan unit primary
interface gigabitEthernet 0/3
no shutdown
2. Assign the failover IP Address on Primary Cisco ASA
Type the following commands that will assign 10.10.10.1 to the 0/3 interface on the primary device. This device should also know what is the failover ip-address of the standby. In this example, it is 10.10.10.2.
Don’t forget to specify a failover key. Ensure that both devices have the same key used when you are configuring failover on the secondary device. In this example, the failover key is “password”.
failover lan interface LANFAIL gigabitethernet 0/3
failover interfaces ip LANFAIL 10.10.10.1 255.255.255.0 standby 10.10.10.2
failover key password
failover link LANFAIL
exit
show failover
3. Assign the Outside IP Address on Primary Cisco ASA
config t
interface gigabitEthernet 0/0
nameif outside
ip address 200.200.200.1 255.255.255.0 standby 200.200.200.2
no shutdown
exit
4. Assign the Internal IP Address on Primary Cisco ASA
interface gigabitEthernet 0/1
nameif internal
security-level 100
ip address 192.168.0.1 255.255.255.0 standby 192.168.0.2
no shutdown
exit
show run
5. Verify the configuration on Primary Cisco ASA
Type the follow commands to verify the configuration you have done.
monitor external
monitor internal
exit
show failover
failover
exit
show failover interface
show failover
6. Setup failover interface on Secondary Primary ASA
config t
no failover
failover lan unit secondary
interface gigabitEthernet 0/3
no nameif
no shutdown
failover lan interface LANFAIL gigabitEthernet 0/3
7. Assign the failover ip-address on Secondary ASA using LANFAIL
failover interface ip LANFAIL 10.10.10.1 255.255.255.0 standby 10.10.10.2
failover key password
failover link LANFAIL
failover
exit
show run
8. Automatic Configuration Copy from Primary Cisco ASA to Secondary Cisco ASA
All other configurations are automatically copied from the primary Cisco ASA device to the standby Cisco ASA device using the following commands:
config t
interface gigabitEthernet 0/3
no shutdown
exit
show failover
9. Additional Commands on Primary Cisco ASA
config
no monitor management

router external 0.0.0.0 0.0.0.0 200.200.200.x
exit
