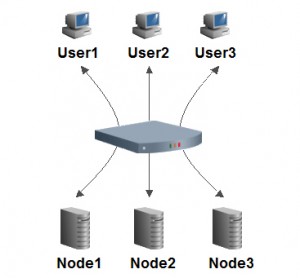
 Before I explain about F5 product, I will try to explain briefly about what a load balancer. Load balancer is a system (usually in the form of a hardware) which will distribute the load evenly to computers, servers, or network link to obtain the maximum resource utilization and quick response time. One of the famous load balance mechanism is called Round Robin in which it will work by splitting the traffic to the servers next to it equally. In the market there are a lot of load balancer products, one of the products that I will explain is called F5 Link Traffic Management.
1. Views on the F5 Link Traffic Management
Glance view of F5 link traffic management can be seen in figure 1.1 below. As you can see on the left side menu, is the menu to configure such as self-ip, virtual server, routing etc .
That menu it used to configure self-ip, virtual server, routing, etc. If we look at figure 1.1, it is a display for the load balance menu. Virtual Server is a server that will be known by the client side and will load balance the traffic to the servers behind it. We can also see in figure 1.1, there is a appearance of blue, and green. It is an indicator whether the servers behind the Virtual Server is down or not. The green color indicates that the server is up, while the blue color indicates that the server unknow
2. The steps to create multiple servers to be load-balanced
Before entering the steps, I will make some example servers that will be load balanced. Here are the datas:
IP address server 1: 10.10.10.72 :80
IP address server 2: 10.10.10.73 :80
IP address server 3: 10.10.10.74 :80
Then the steps to put all datas abouve to the Virtual Server are like below:
1. Go to Local Traffic>Virtual Servers> Pools
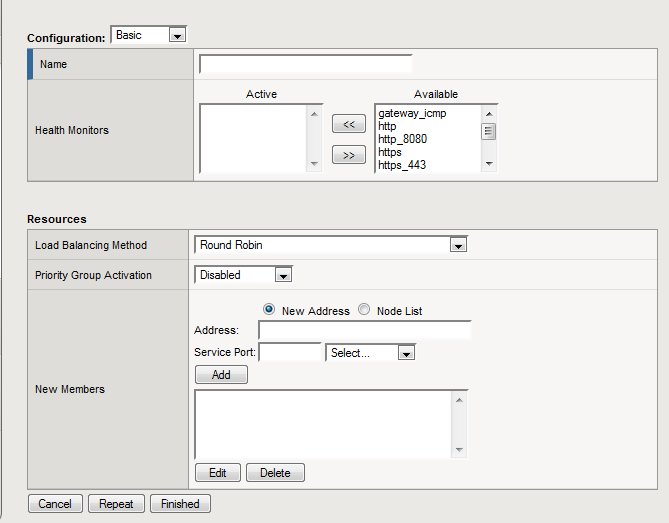
2. Then click Create on the right side so that the appreance will be like figure 1.2
Figure 1.2
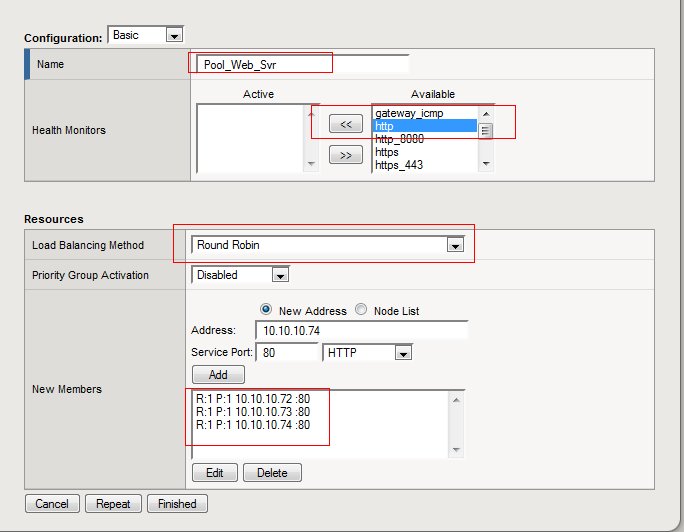
3. Fill in the pool name (any words), in this tutorial I fill ‘Pool_Web_Svr’. Then select http service for the health monitor. The function of the health monitor is to check the condition of each of the servers that exists in the pool, so if the http service from one of these servers is not up then the system will be considered down and will not be put in the load balance mechanism.
4. After that, select the type of load balance you want, in this case I chose “Round Robin”. Round Robin is a common load balance method. But in the real world, this default method can be changed depending on requests from users.
5. Enter one by one for the IP address which I mention the above into the address field, and its service and then click add.
Here is the view where the data is entered. After that you can immediately proceed to the step-3
Figure 1.3
3. Steps to create a Virtual Server.
After the pool above has been made then the next step is to create a Virtual Server, Virtual Server is a server that seems to serve users from outside, but the original servers are not visible from the outside. The steps are as follows:
1. Go to Local Traffic>Virtual Servers
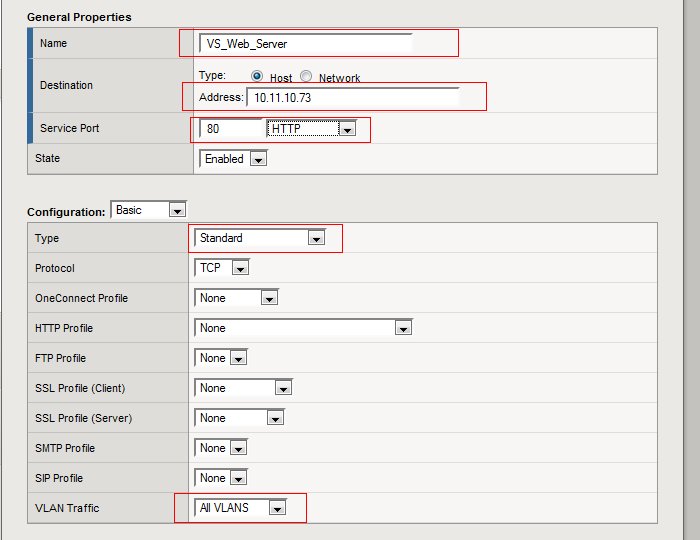
2. Then click Create . Enter data as shown in Figure 1.4 – 1.5 below, then click Finish:
Figure 1.4
Figure 1.5
After the three steps above are made, the user does not need physical access to IP from a web server, just enough to Virtual server and it will automatically be shared to each web server via their real ip address.
PS: If you are confused after reading this tutorial.
How to configure Virtual Server & Pool on F5 Link Traffic Management


